
2013年10月20日
Raspberry PiでOpenSim:USB-HD接続編
外付けのUSBタイプHDD(バスパワータイプ)を追加して、homeとvarディレクトリーを移動しました。
忘れないうちに、メモってみます。
USB-HDは2.5インチHD/500MBでUSB2.0対応です。
UBSに接続すると、リセットされてしまいます。
突入電流が多いようで、Raspberryの電源回路に接続されている復帰タイプのヒューズが
動作するようです。
一応、一度、リセットがかかり、立ち上がるので、大丈夫かな^^;
・・・って 思ってたのですが、HDDにコピーしてる最中にハングアップしてしまいました。
電源に接続されている復帰型ヒューズが動作してるような感じです。
う〜〜ん 復帰型ヒュースの定格1Aなんだぁ^^ HDD(バスパワータイプなので)追加したから電源が不安定になったみたい。
え〜〜と 解決策はというと 4つほどあるみたいです。
1つ目は、復帰型ヒューズを殺しちゃう^^;(電源アダプターに余裕があるとき)
2つ目は、電源アダプタ付きUSBハブで電源供給
3つ目は、I/Oポートの5V端子から電源供給
4つ目は、セルフパワータイプのHDDを使う(もう買ちゃったから^^;)
アダプターの電源容量は2Aなのですが、復帰タイプヒューズは1Aなので、2Aにした意味がないような気がします
ということでヒューズをショートして殺すことで、対応しました^^;(ちょっと怖いけど^^)
下記の写真では、右下のF3のヒューズをスズメッキ線で半田付けショートしています(ちょっと見難いですが赤枠内です)
さて、追加の作業に移ります。
パーテーションは、次のように配置しました。
総容量 500GBなので
/home :250GB
/var :50GB
残り200GBは将来 /usrなどを移動するときのためにキープ
まず、ちゃんと認識されているか確認します。
pi@raspberrypi ~ $ sudo fdisk -l
Disk /dev/mmcblk0: 15.8 GB, 15803088896 bytes
4 heads, 16 sectors/track, 482272 cylinders, total 30865408 sectors
Units = sectors of 1 * 512 = 512 bytes
Sector size (logical/physical): 512 bytes / 512 bytes
I/O size (minimum/optimal): 512 bytes / 512 bytes
Disk identifier: 0x000b03b7
Device Boot Start End Blocks Id System
/dev/mmcblk0p1 8192 122879 57344 c W95 FAT32 (LBA)
/dev/mmcblk0p2 122880 30865407 15371264 83 Linux
Disk /dev/sda: 500.1 GB, 500107862016 bytes
255 heads, 63 sectors/track, 60801 cylinders, total 976773168 sectors
Units = sectors of 1 * 512 = 512 bytes
Sector size (logical/physical): 512 bytes / 512 bytes
I/O size (minimum/optimal): 512 bytes / 512 bytes
Disk identifier: 0x000a1cc6
Device Boot Start End Blocks Id System
/dev/sda1 2048 976773119 488385536 b W95 FAT32
追加したHDDは/dev/sda1で認識されているようです。
それではパーテーションを切ります。
pi@raspberrypi ~ $ sudo fdisk /dev/sda
Command (m for help): p :現在のパーテーション情報を表示します
Disk /dev/sda: 500.1 GB, 500107862016 bytes
255 heads, 63 sectors/track, 60801 cylinders, total 976773168 sectors
Units = sectors of 1 * 512 = 512 bytes
Sector size (logical/physical): 512 bytes / 512 bytes
I/O size (minimum/optimal): 512 bytes / 512 bytes
Disk identifier: 0x000a1cc6
Device Boot Start End Blocks Id System
/dev/sda1 2048 976773119 488385536 b W95 FAT32
Command (m for help): d :パーテーションを仕切りなおすために、現在のパーテーションを削除します。
Selected partition 1
Command (m for help): p :削除されたか確認します
Disk /dev/sda: 500.1 GB, 500107862016 bytes
255 heads, 63 sectors/track, 60801 cylinders, total 976773168 sectors
Units = sectors of 1 * 512 = 512 bytes
Sector size (logical/physical): 512 bytes / 512 bytes
I/O size (minimum/optimal): 512 bytes / 512 bytes
Disk identifier: 0x000a1cc6
Device Boot Start End Blocks Id System
Command (m for help): n :新たにパーテーションを切ります。
Partition type:
p primary (0 primary, 0 extended, 4 free)
e extended
Select (default p): p
Partition number (1-4, default 1): 1 :パーテーションの1番目を指定
First sector (2048-976773167, default 2048): :最初から(単にEnter)
Using default value 2048
Last sector, +sectors or +size{K,M,G} (2048-976773167, default 976773167): +250G :250GB 確保
Command (m for help): t :確保したパーテーションをlinux用にタイプ(83)を決定します
Selected partition 1
Hex code (type L to list codes): 83
Command (m for help): n :/var用に50GBのパーテーションを切ります。
Partition type:
p primary (1 primary, 0 extended, 3 free)
e extended
Select (default p): p
Partition number (1-4, default 2): 2 :パーテーションの2番めを指定
First sector (524290048-976773167, default 524290048)::1番目のパーテーションの続きから(単にEnter)
Using default value 524290048
Last sector, +sectors or +size{K,M,G} (524290048-976773167, default 976773167): +50G :50GB 確保
Command (m for help): t :確保したパーテーションをlinux用にタイプ(83)を決定します
Partition number (1-4): 2
Hex code (type L to list codes): 83
Command (m for help): p :新たに確保したパーテーションを確認します
Disk /dev/sda: 500.1 GB, 500107862016 bytes
255 heads, 63 sectors/track, 60801 cylinders, total 976773168 sectors
Units = sectors of 1 * 512 = 512 bytes
Sector size (logical/physical): 512 bytes / 512 bytes
I/O size (minimum/optimal): 512 bytes / 512 bytes
Disk identifier: 0x000a1cc6
Device Boot Start End Blocks Id System
/dev/sda1 2048 524290047 262144000 83 Linux
/dev/sda2 524290048 629147647 52428800 83 Linux
Command (m for help): w :最後にパーテーション情報を書き込みします。
The partition table has been altered!
Calling ioctl() to re-read partition table.
Syncing disks.
続いて、 パーテーションをフォーマットします。
フォーマットタイプは ext4としました。
pi@raspberrypi ~ $ sudo mkfs -t ext4 /dev/sda1
mke2fs 1.42.5 (29-Jul-2012)
Filesystem label=
OS type: Linux
Block size=4096 (log=2)
Fragment size=4096 (log=2)
Stride=0 blocks, Stripe width=0 blocks
16384000 inodes, 65536000 blocks
3276800 blocks (5.00%) reserved for the super user
First data block=0
Maximum filesystem blocks=0
2000 block groups
32768 blocks per group, 32768 fragments per group
8192 inodes per group
Superblock backups stored on blocks:
32768, 98304, 163840, 229376, 294912, 819200, 884736, 1605632, 2654208,
4096000, 7962624, 11239424, 20480000, 23887872
Allocating group tables: done
Writing inode tables: done
Creating journal (32768 blocks): done
Writing superblocks and filesystem accountin
同様に /dev/sda2もフォーマットします。
pi@raspberrypi ~ $ sudo mkfs -t ext4 /dev/sda2
現在の/homeと/varをコピーするために、USB-HDをマウントします。
その前に、マウント用のデレクトリを作成します。
pi@raspberrypi ~ $ sudo mkdir /mnt/home_new
pi@raspberrypi ~ $ sudo mkdir /mnt/var_new
マウントします。
pi@raspberrypi ~ $ sudo mount /dev/sda1 /mnt/home_new
pi@raspberrypi ~ $ sudo mount /dev/sda2 /mnt/var_new
現在の/home及び /varをマウントしたHDDにコピーします。
pi@raspberrypi / $ sudo cp -a /home/* /mnt/home_new
pi@raspberrypi / $ sudo cp -a /var/* /mnt/var_new
現在の/home /varをリネームします。
pi@raspberrypi / $ sudo mv home home.BAK
pi@raspberrypi / $ sudo mv var var.BAK
ルート/から home及びvarからマウントを参照できるようにルートにhomeとvarの
マウントディレクトリーを作成します。
pi@raspberrypi / $ sudo mkdir home
pi@raspberrypi / $ sudo mkdir var
作成されたディレクトリーを確認してみます
pi@raspberrypi / $ ls
bin dev home lib media opt root sbin srv tmp var
boot etc home.BAK lost+found mnt proc run selinux sys usr var.BAK
ブート時に自動で homeとvarがマウントされるように /etc/fstabを編集します。
pi@raspberrypi / $ sudo vim /etc/fstab
下記 2行を追記します(この設定はこれまでの環境での設定です)
/dev/sda1 /home ext4 defaults,noatime 0 2
/dev/sda2 /var ext4 defaults,noatime 0 2
追加後は次のようになります
proc /proc proc defaults 0 0
/dev/sda1 /home ext4 defaults,noatime 0 2
/dev/sda2 /var ext4 defaults,noatime 0 2
/dev/mmcblk0p1 /boot vfat defaults 0 2
/dev/mmcblk0p2 / ext4 defaults,noatime 0 1
# a swapfile is not a swap partition, so no using swapon|off from here on, use dphys-swapfile swap[on|off] for that
これで 移管の作業は終了しました
リブートします。
pi@raspberrypi / $ sudo shutdown -r now
再度 sshでリモートアクセスします
マウント状況を確認してみます
pi@raspberrypi ~ $ df
ファイルシス 1K-ブロック 使用 使用可 使用% マウント位置
rootfs 15128576 3217260 11278232 23% /
/dev/root 15128576 3217260 11278232 23% /
devtmpfs 216108 0 216108 0% /dev
tmpfs 44876 204 44672 1% /run
tmpfs 5120 0 5120 0% /run/lock
tmpfs 89740 0 89740 0% /run/shm
/dev/sda1 258030980 1418104 243505676 1% /home
/dev/sda2 51606140 464468 48520232 1% /var
/dev/mmcblk0p1 57288 18536 38752 33% /boot
ちゃんとマウントされているみたいです。
OpenSimが立ち上がるか確認します。
pi@raspberrypi ~ $ cd opensim-0.7.5
pi@raspberrypi ~/opensim-0.7.5 $ cd bin
pi@raspberrypi ~/opensim-0.7.5/bin $ mono OpenSim.exe
13:22:02 - [OPENSIM MAIN]: configured log4net using default OpenSim.exe.config
13:22:03 - [OPENSIM MAIN]: System Locale is ja-JP
13:22:03 - [OPENSIM MAIN]: Environment variable MONO_THREADS_PER_CPU is unset
13:22:03 - [OPENSIM MAIN]: Runtime gave us 100 worker threads and 4 IOCP threads
13:22:03 - [OPENSIM MAIN]: Bumping up to 500 worker threads and 1000 IOCP threads
13:22:03 - Environment is compatible.
13:22:04 - [CONFIG]: Reading configuration settings
・
・
中略
・
・
13:23:18 - [MAPTILE]: Generating Maptile Step 1: Done in 1333 ms
13:23:18 - [MAPTILE]: Generating Maptile Step 2: Object Volume Profile
13:23:18 - [MAPTILE]: Generating Maptile Step 2: Done in 78 ms
Region (rikachan_island) #
ちゃんと立ち上がりました^^
起動中にはUSB-HDDのアクセスランプも点滅していました^^
mysqlのDBは、デフォルトでは/varの中に存在するようなので、DBの移管も終わってます^^
mysqlの設定ファイル /etc/mysql/my.cnf
下記 抜粋です
[mysqld]
#
# * Basic Settings
#
user = mysql
pid-file = /var/run/mysqld/mysqld.pid
socket = /var/run/mysqld/mysqld.sock
port = 3306
basedir = /usr
datadir = /var/lib/mysql
tmpdir = /tmp
lc-messages-dir = /usr/share/mysql
skip-external-locking
忘れないうちに、メモってみます。
USB-HDは2.5インチHD/500MBでUSB2.0対応です。
UBSに接続すると、リセットされてしまいます。
突入電流が多いようで、Raspberryの電源回路に接続されている復帰タイプのヒューズが
動作するようです。
一応、一度、リセットがかかり、立ち上がるので、大丈夫かな^^;
・・・って 思ってたのですが、HDDにコピーしてる最中にハングアップしてしまいました。
電源に接続されている復帰型ヒューズが動作してるような感じです。
う〜〜ん 復帰型ヒュースの定格1Aなんだぁ^^ HDD(バスパワータイプなので)追加したから電源が不安定になったみたい。
え〜〜と 解決策はというと 4つほどあるみたいです。
1つ目は、復帰型ヒューズを殺しちゃう^^;(電源アダプターに余裕があるとき)
2つ目は、電源アダプタ付きUSBハブで電源供給
3つ目は、I/Oポートの5V端子から電源供給
4つ目は、セルフパワータイプのHDDを使う(もう買ちゃったから^^;)
アダプターの電源容量は2Aなのですが、復帰タイプヒューズは1Aなので、2Aにした意味がないような気がします
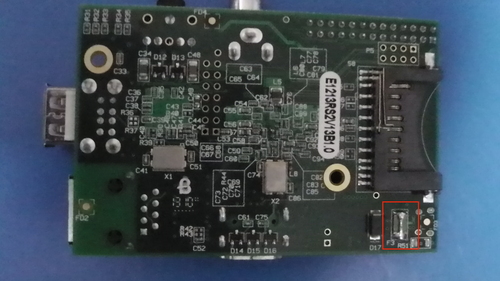
ということでヒューズをショートして殺すことで、対応しました^^;(ちょっと怖いけど^^)
下記の写真では、右下のF3のヒューズをスズメッキ線で半田付けショートしています(ちょっと見難いですが赤枠内です)

さて、追加の作業に移ります。
パーテーションは、次のように配置しました。
総容量 500GBなので
/home :250GB
/var :50GB
残り200GBは将来 /usrなどを移動するときのためにキープ
まず、ちゃんと認識されているか確認します。
pi@raspberrypi ~ $ sudo fdisk -l
Disk /dev/mmcblk0: 15.8 GB, 15803088896 bytes
4 heads, 16 sectors/track, 482272 cylinders, total 30865408 sectors
Units = sectors of 1 * 512 = 512 bytes
Sector size (logical/physical): 512 bytes / 512 bytes
I/O size (minimum/optimal): 512 bytes / 512 bytes
Disk identifier: 0x000b03b7
Device Boot Start End Blocks Id System
/dev/mmcblk0p1 8192 122879 57344 c W95 FAT32 (LBA)
/dev/mmcblk0p2 122880 30865407 15371264 83 Linux
Disk /dev/sda: 500.1 GB, 500107862016 bytes
255 heads, 63 sectors/track, 60801 cylinders, total 976773168 sectors
Units = sectors of 1 * 512 = 512 bytes
Sector size (logical/physical): 512 bytes / 512 bytes
I/O size (minimum/optimal): 512 bytes / 512 bytes
Disk identifier: 0x000a1cc6
Device Boot Start End Blocks Id System
/dev/sda1 2048 976773119 488385536 b W95 FAT32
追加したHDDは/dev/sda1で認識されているようです。
それではパーテーションを切ります。
pi@raspberrypi ~ $ sudo fdisk /dev/sda
Command (m for help): p :現在のパーテーション情報を表示します
Disk /dev/sda: 500.1 GB, 500107862016 bytes
255 heads, 63 sectors/track, 60801 cylinders, total 976773168 sectors
Units = sectors of 1 * 512 = 512 bytes
Sector size (logical/physical): 512 bytes / 512 bytes
I/O size (minimum/optimal): 512 bytes / 512 bytes
Disk identifier: 0x000a1cc6
Device Boot Start End Blocks Id System
/dev/sda1 2048 976773119 488385536 b W95 FAT32
Command (m for help): d :パーテーションを仕切りなおすために、現在のパーテーションを削除します。
Selected partition 1
Command (m for help): p :削除されたか確認します
Disk /dev/sda: 500.1 GB, 500107862016 bytes
255 heads, 63 sectors/track, 60801 cylinders, total 976773168 sectors
Units = sectors of 1 * 512 = 512 bytes
Sector size (logical/physical): 512 bytes / 512 bytes
I/O size (minimum/optimal): 512 bytes / 512 bytes
Disk identifier: 0x000a1cc6
Device Boot Start End Blocks Id System
Command (m for help): n :新たにパーテーションを切ります。
Partition type:
p primary (0 primary, 0 extended, 4 free)
e extended
Select (default p): p
Partition number (1-4, default 1): 1 :パーテーションの1番目を指定
First sector (2048-976773167, default 2048): :最初から(単にEnter)
Using default value 2048
Last sector, +sectors or +size{K,M,G} (2048-976773167, default 976773167): +250G :250GB 確保
Command (m for help): t :確保したパーテーションをlinux用にタイプ(83)を決定します
Selected partition 1
Hex code (type L to list codes): 83
Command (m for help): n :/var用に50GBのパーテーションを切ります。
Partition type:
p primary (1 primary, 0 extended, 3 free)
e extended
Select (default p): p
Partition number (1-4, default 2): 2 :パーテーションの2番めを指定
First sector (524290048-976773167, default 524290048)::1番目のパーテーションの続きから(単にEnter)
Using default value 524290048
Last sector, +sectors or +size{K,M,G} (524290048-976773167, default 976773167): +50G :50GB 確保
Command (m for help): t :確保したパーテーションをlinux用にタイプ(83)を決定します
Partition number (1-4): 2
Hex code (type L to list codes): 83
Command (m for help): p :新たに確保したパーテーションを確認します
Disk /dev/sda: 500.1 GB, 500107862016 bytes
255 heads, 63 sectors/track, 60801 cylinders, total 976773168 sectors
Units = sectors of 1 * 512 = 512 bytes
Sector size (logical/physical): 512 bytes / 512 bytes
I/O size (minimum/optimal): 512 bytes / 512 bytes
Disk identifier: 0x000a1cc6
Device Boot Start End Blocks Id System
/dev/sda1 2048 524290047 262144000 83 Linux
/dev/sda2 524290048 629147647 52428800 83 Linux
Command (m for help): w :最後にパーテーション情報を書き込みします。
The partition table has been altered!
Calling ioctl() to re-read partition table.
Syncing disks.
続いて、 パーテーションをフォーマットします。
フォーマットタイプは ext4としました。
pi@raspberrypi ~ $ sudo mkfs -t ext4 /dev/sda1
mke2fs 1.42.5 (29-Jul-2012)
Filesystem label=
OS type: Linux
Block size=4096 (log=2)
Fragment size=4096 (log=2)
Stride=0 blocks, Stripe width=0 blocks
16384000 inodes, 65536000 blocks
3276800 blocks (5.00%) reserved for the super user
First data block=0
Maximum filesystem blocks=0
2000 block groups
32768 blocks per group, 32768 fragments per group
8192 inodes per group
Superblock backups stored on blocks:
32768, 98304, 163840, 229376, 294912, 819200, 884736, 1605632, 2654208,
4096000, 7962624, 11239424, 20480000, 23887872
Allocating group tables: done
Writing inode tables: done
Creating journal (32768 blocks): done
Writing superblocks and filesystem accountin
同様に /dev/sda2もフォーマットします。
pi@raspberrypi ~ $ sudo mkfs -t ext4 /dev/sda2
現在の/homeと/varをコピーするために、USB-HDをマウントします。
その前に、マウント用のデレクトリを作成します。
pi@raspberrypi ~ $ sudo mkdir /mnt/home_new
pi@raspberrypi ~ $ sudo mkdir /mnt/var_new
マウントします。
pi@raspberrypi ~ $ sudo mount /dev/sda1 /mnt/home_new
pi@raspberrypi ~ $ sudo mount /dev/sda2 /mnt/var_new
現在の/home及び /varをマウントしたHDDにコピーします。
pi@raspberrypi / $ sudo cp -a /home/* /mnt/home_new
pi@raspberrypi / $ sudo cp -a /var/* /mnt/var_new
現在の/home /varをリネームします。
pi@raspberrypi / $ sudo mv home home.BAK
pi@raspberrypi / $ sudo mv var var.BAK
ルート/から home及びvarからマウントを参照できるようにルートにhomeとvarの
マウントディレクトリーを作成します。
pi@raspberrypi / $ sudo mkdir home
pi@raspberrypi / $ sudo mkdir var
作成されたディレクトリーを確認してみます
pi@raspberrypi / $ ls
bin dev home lib media opt root sbin srv tmp var
boot etc home.BAK lost+found mnt proc run selinux sys usr var.BAK
ブート時に自動で homeとvarがマウントされるように /etc/fstabを編集します。
pi@raspberrypi / $ sudo vim /etc/fstab
下記 2行を追記します(この設定はこれまでの環境での設定です)
/dev/sda1 /home ext4 defaults,noatime 0 2
/dev/sda2 /var ext4 defaults,noatime 0 2
追加後は次のようになります
proc /proc proc defaults 0 0
/dev/sda1 /home ext4 defaults,noatime 0 2
/dev/sda2 /var ext4 defaults,noatime 0 2
/dev/mmcblk0p1 /boot vfat defaults 0 2
/dev/mmcblk0p2 / ext4 defaults,noatime 0 1
# a swapfile is not a swap partition, so no using swapon|off from here on, use dphys-swapfile swap[on|off] for that
これで 移管の作業は終了しました
リブートします。
pi@raspberrypi / $ sudo shutdown -r now
再度 sshでリモートアクセスします
マウント状況を確認してみます
pi@raspberrypi ~ $ df
ファイルシス 1K-ブロック 使用 使用可 使用% マウント位置
rootfs 15128576 3217260 11278232 23% /
/dev/root 15128576 3217260 11278232 23% /
devtmpfs 216108 0 216108 0% /dev
tmpfs 44876 204 44672 1% /run
tmpfs 5120 0 5120 0% /run/lock
tmpfs 89740 0 89740 0% /run/shm
/dev/sda1 258030980 1418104 243505676 1% /home
/dev/sda2 51606140 464468 48520232 1% /var
/dev/mmcblk0p1 57288 18536 38752 33% /boot
ちゃんとマウントされているみたいです。
OpenSimが立ち上がるか確認します。
pi@raspberrypi ~ $ cd opensim-0.7.5
pi@raspberrypi ~/opensim-0.7.5 $ cd bin
pi@raspberrypi ~/opensim-0.7.5/bin $ mono OpenSim.exe
13:22:02 - [OPENSIM MAIN]: configured log4net using default OpenSim.exe.config
13:22:03 - [OPENSIM MAIN]: System Locale is ja-JP
13:22:03 - [OPENSIM MAIN]: Environment variable MONO_THREADS_PER_CPU is unset
13:22:03 - [OPENSIM MAIN]: Runtime gave us 100 worker threads and 4 IOCP threads
13:22:03 - [OPENSIM MAIN]: Bumping up to 500 worker threads and 1000 IOCP threads
13:22:03 - Environment is compatible.
13:22:04 - [CONFIG]: Reading configuration settings
・
・
中略
・
・
13:23:18 - [MAPTILE]: Generating Maptile Step 1: Done in 1333 ms
13:23:18 - [MAPTILE]: Generating Maptile Step 2: Object Volume Profile
13:23:18 - [MAPTILE]: Generating Maptile Step 2: Done in 78 ms
Region (rikachan_island) #
ちゃんと立ち上がりました^^
起動中にはUSB-HDDのアクセスランプも点滅していました^^
mysqlのDBは、デフォルトでは/varの中に存在するようなので、DBの移管も終わってます^^
mysqlの設定ファイル /etc/mysql/my.cnf
下記 抜粋です
[mysqld]
#
# * Basic Settings
#
user = mysql
pid-file = /var/run/mysqld/mysqld.pid
socket = /var/run/mysqld/mysqld.sock
port = 3306
basedir = /usr
datadir = /var/lib/mysql
tmpdir = /tmp
lc-messages-dir = /usr/share/mysql
skip-external-locking


Raspberry PiでOpenSim:バックグランド起動
Raspberry PiでOpenSim:MySQL接続編
Raspberry PiでOpenSim:ビュア接続編
Raspberry PiでOpenSim:エラー対応編
Raspberry Piで OpenSimその1
Raspberry PiでOpenSim:OSセットアップ編
Raspberry PiでOpenSim:MySQL接続編
Raspberry PiでOpenSim:ビュア接続編
Raspberry PiでOpenSim:エラー対応編
Raspberry Piで OpenSimその1
Raspberry PiでOpenSim:OSセットアップ編
Posted by rikachann Aabye at 13:48│Comments(0)
│raspberry Pi